Adding holidays to your Outlook calendar shouldn't be a headache. You'd think it would be simple, but Outlook makes it surprisingly tricky. Luckily, there's a much easier way! In this post, we'll show you two methods: the convoluted Outlook way, and the super-simple Timetastic way (hint: it involves automation and takes just minutes!).
We'll even show you how to get started with a free trial!

Adding your own leave to your Outlook calendar (using only Outlook)
If your manager hasn’t set up and shared a separate annual leave calendar in Outlook (more about this later), you’ll have to jump through quite a few hoops to share your holiday plans with your colleagues using Outlook.
Step 1: Go to your own calendar and create a new meeting appointment.
Recording annual leave in Outlook requires you to complete a series of steps to complete the process. Take a look at our steps below to find out how to add holidays to your Outlook calendar.
- Create a meeting appointment in your Outlook calendar
- Type in a description in the subject box (E.g. holiday leave, sick day)
- Pick a start time and end time for the meeting.

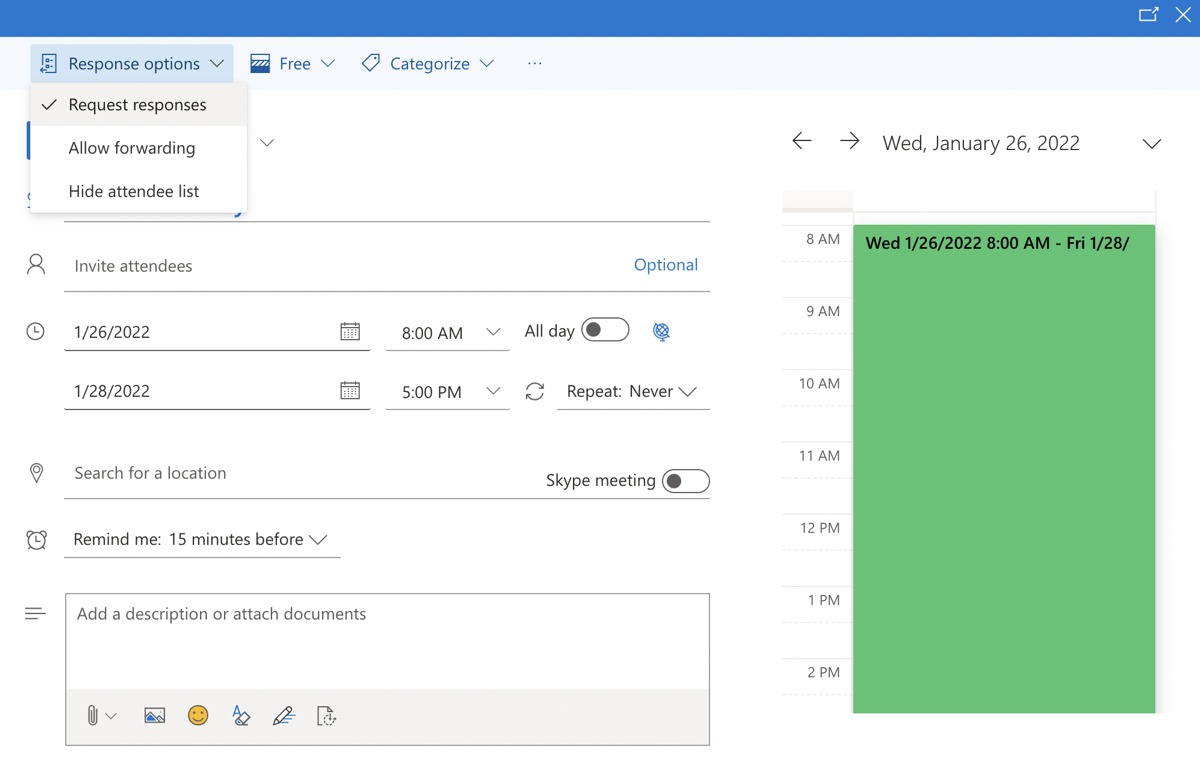
Step 2: Click “Request responses”
Then you’ll want to click the “Response options” drop-down menu and click “Request responses.” This way, your team can acknowledge that they got your time off notification.
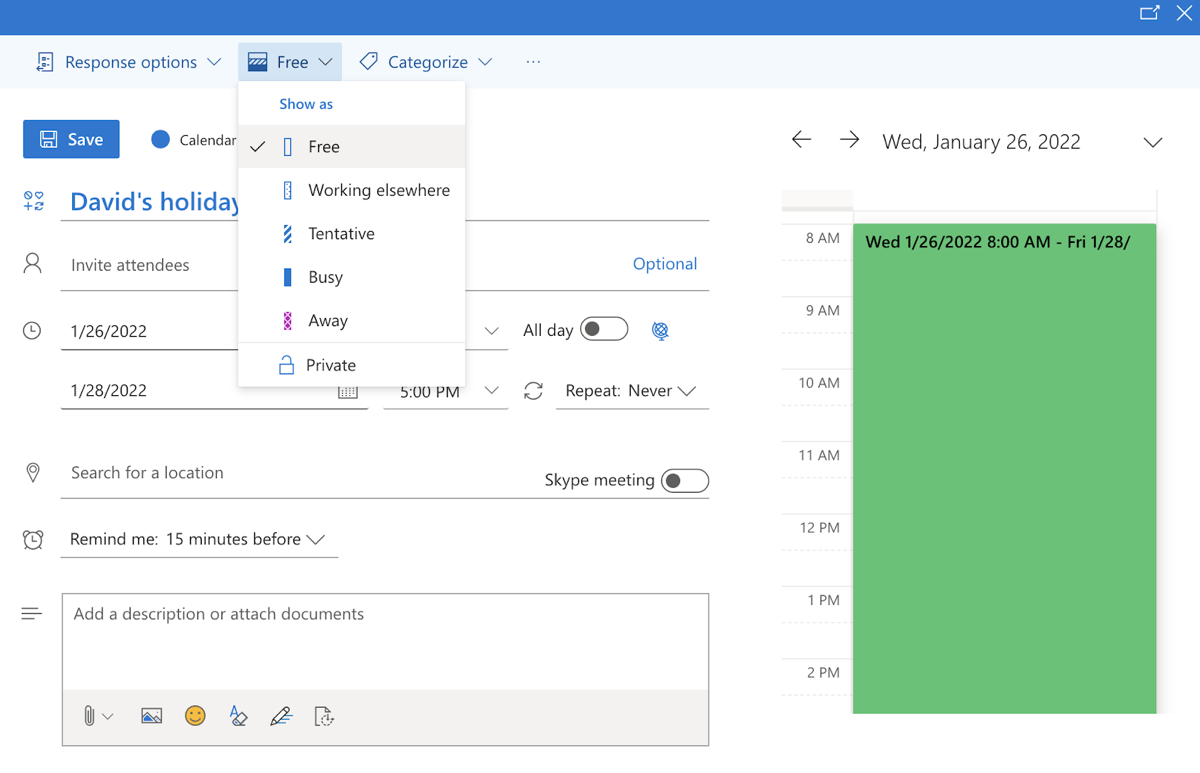
Step 3: Mark your holiday in Outlook as “free”
Be sure to set yourself as “free” when you create the meeting, otherwise all of your team who add your holiday to their outlook calendar will have their entire day blocked out by the meeting. Step 3: Mark your holiday in Outlook as “free”
FYI: If you’re putting in an all-day event, Microsoft Office defaults to “free.”
After you’ve done that, you will add who you want this notice to go to. The event is then added to their Outlook calendar and they get a notification in their inbox.

But there’s still a bit left to do.
Step 4: Do it all again for your own calendar (yes, really!)
Because you marked that time away as “free,” that means it’s marked as “free” on your own personal calendar, too. That’s a problem, because you’re not free, you’re out of office on holiday.
To get around this, you need to create an additional appointment for yourself on your calendar. But this time, set yourself as “Away” and don’t invite any attendees.
Now, if someone on your team looks up your calendar, they’ll see that you’re on holiday.
How to create a shared calendar for time off requests only
If you’re managing a really small team, you might be able to get away with having everyone just add annual leave to their Outlook calendars (and sharing it with whoever is necessary).
But if you’re managing a larger team — or if you’re also trying to track your staff’s leave balances in Outlook — then you’re going to need to create a completely new calendar in Outlook that’s just for time off requests. For more tips, check out our blog post on managing annual leave.
Unfortunately, this is pretty complicated if you’re just sticking with Outlook calendar. In other words, if you’re not using a leave management app — like Timetastic.
You can find a full breakdown of the process from The Microsoft Outlook Ideas Book.
While this is a good resource if you want to set up a shared Outlook calendar for annual leave requests, if you click the link, you’ll see it’s still not an easy task if you’re not a developer.
And once you’ve gone through all of these steps to create your shared calendar, you’re facing the same problem: You’ll still need to add everyone’s individual time off to the calendar (using the process we explained above).
So, as you can see, the process isn’t exactly plain sailing! But, we have an alternative that can make adding annual leaves to your Outlook calendar a breeze…
How to add annual leave to your Outlook calendar with Timetastic
Timetastic simplifies the whole time off process — it can manage all of your annual leave needs (from booking holidays to doing absence tracking), and it automatically syncs with your Outlook calendar to share holidays, sick leave, and other types of leave across your organisation.
When your team wants to book time off, they do it in Timetastic. They select the dates, pick the type of leave they’re taking (holiday, sick leave, etc.), and book their request.
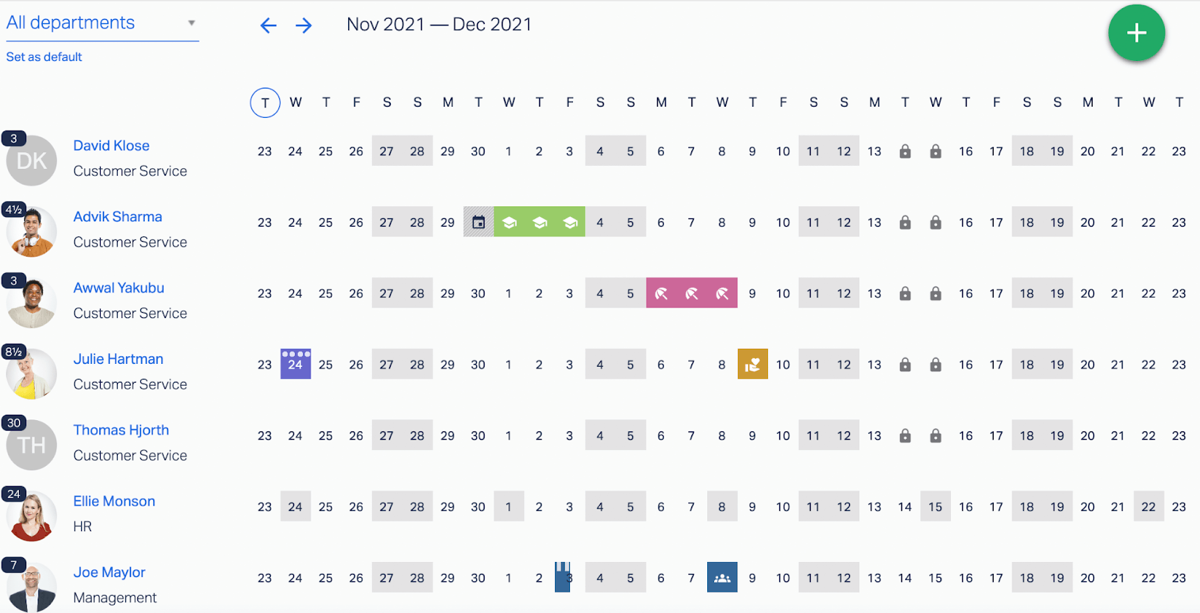
Approved requests show up in your company’s Wallchart, which can have different departments to reflect your company’s organisational structure.
Everyone can access the Wallchart, quickly seeing who is off now or has a holiday coming up soon.
And you can set up your Timetastic Wallchart to share this information automatically with your Outlook calendar via our calendar subscriptions. This syncs everything in real-time.
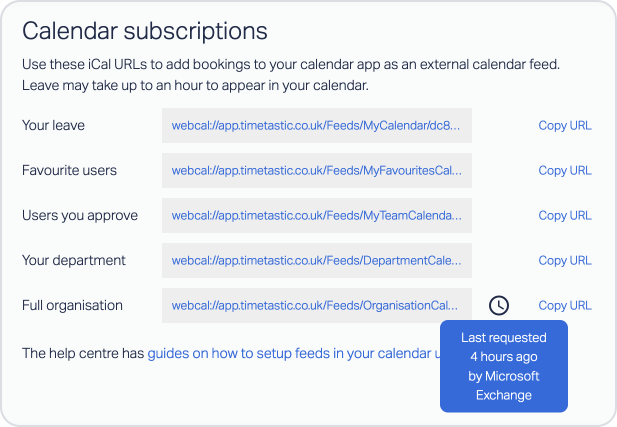
Simply take the iCal URL you need to add the holidays you want to your Outlook calendar.
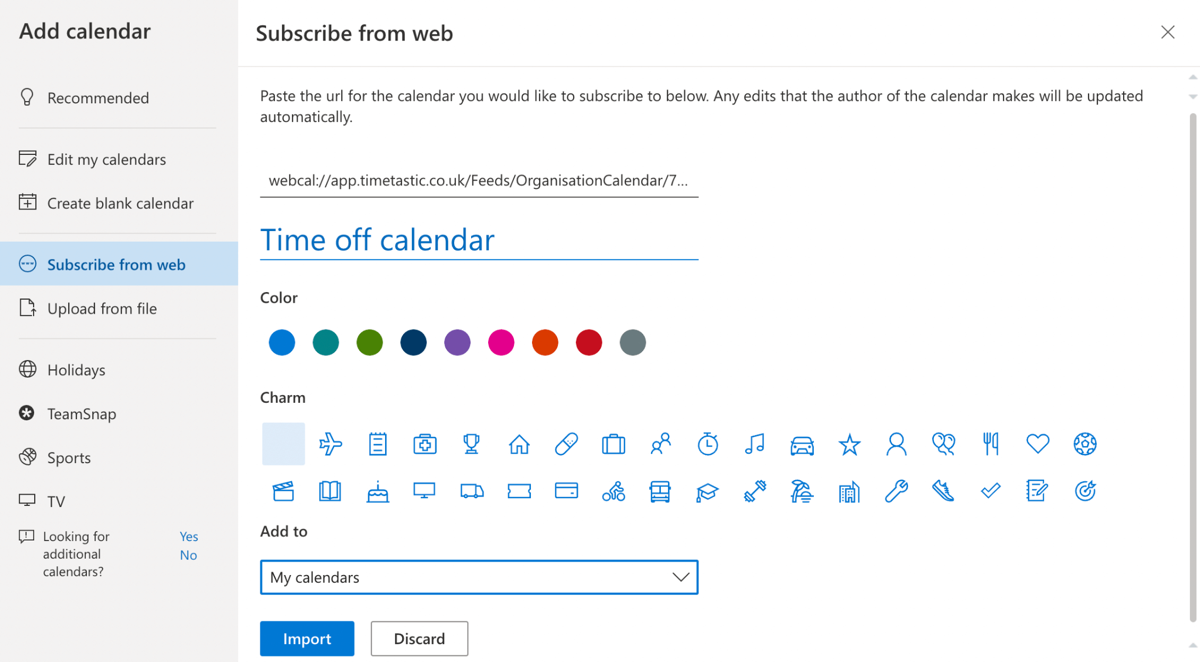
Now, when someone books a holiday in Timetastic, it shows up in your Outlook calendar.
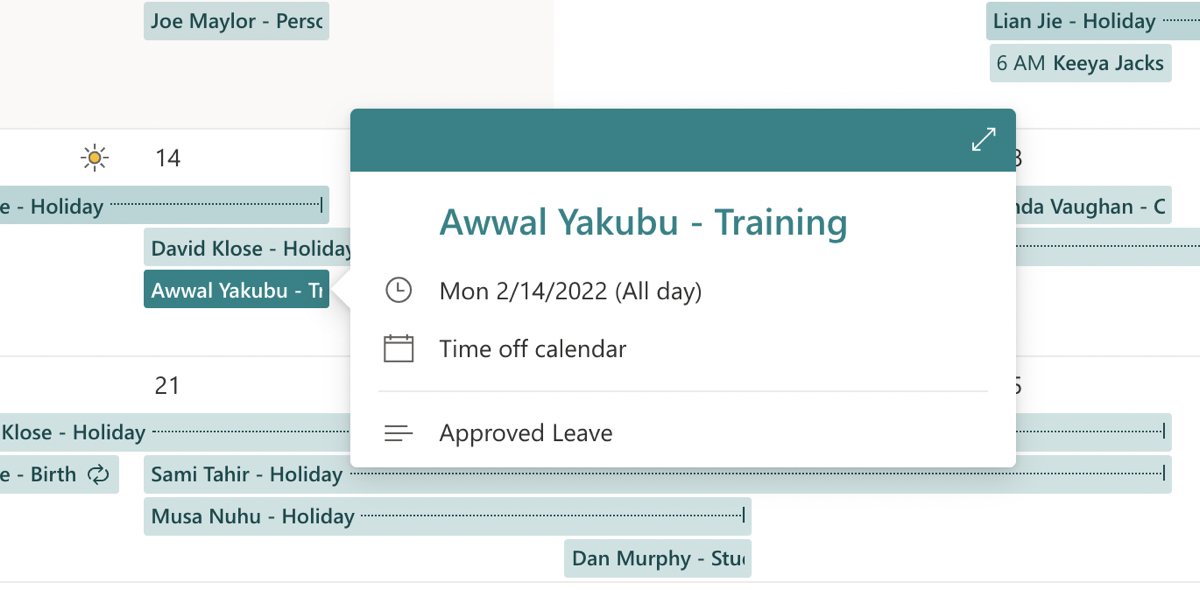
And when you click on someone’s approved time off, you can still see why they’re taking time off.
Here are a couple of useful Help Centre links to help with implementing this:
It’s that simple. No double work is needed and you and your team will always have up-to-date and accurate information.
Benefits of using Timetastic to manage your team’s leave
Timetastic is software for annual leave with a range of handy tools to make management easier for you and your staff. (in fact, it’s simple enough to use from your smartphone). As well as syncing with your Outlook calendar, Timetastic also comes with several other benefits, including:
- Leave request software for instant approvals of leave
- Automatic approval of leave requests (if you prefer).
- An updated record of everyone’s annual leave.
- Absence insights, so you can track patterns and trends.
- Absence summaries, which are sent directly to your inbox.
Easier approval of leave requests
With Timetastic, it’s really easy to respond to someone’s time off request.
After a staff member submits their holiday request via the Timetastic smartphone or web app, you can choose to receive it in your email inbox or as a direct message via Slack or MS Teams.

Once you get the request, you can approve or decline their request from there without having to log into Timetastic.
You can also set up Timetastic to automatically approve time off requests, while still keeping control over how many people you have in the office.
- First, you set your maximum absent levels. This is how many people your company can afford to have off on any given day.
- Then you lock your key dates. A locked date is when your team can’t take a holiday, whether that’s a particularly busy time or when you have certain deadlines.
With maximum absence levels and locked dates all set up, Timetastic will be able to approve or decline holiday requests without you having to manage them manually. This saves you even more time, while having the system in place means you don’t lose grip of staff holidays.
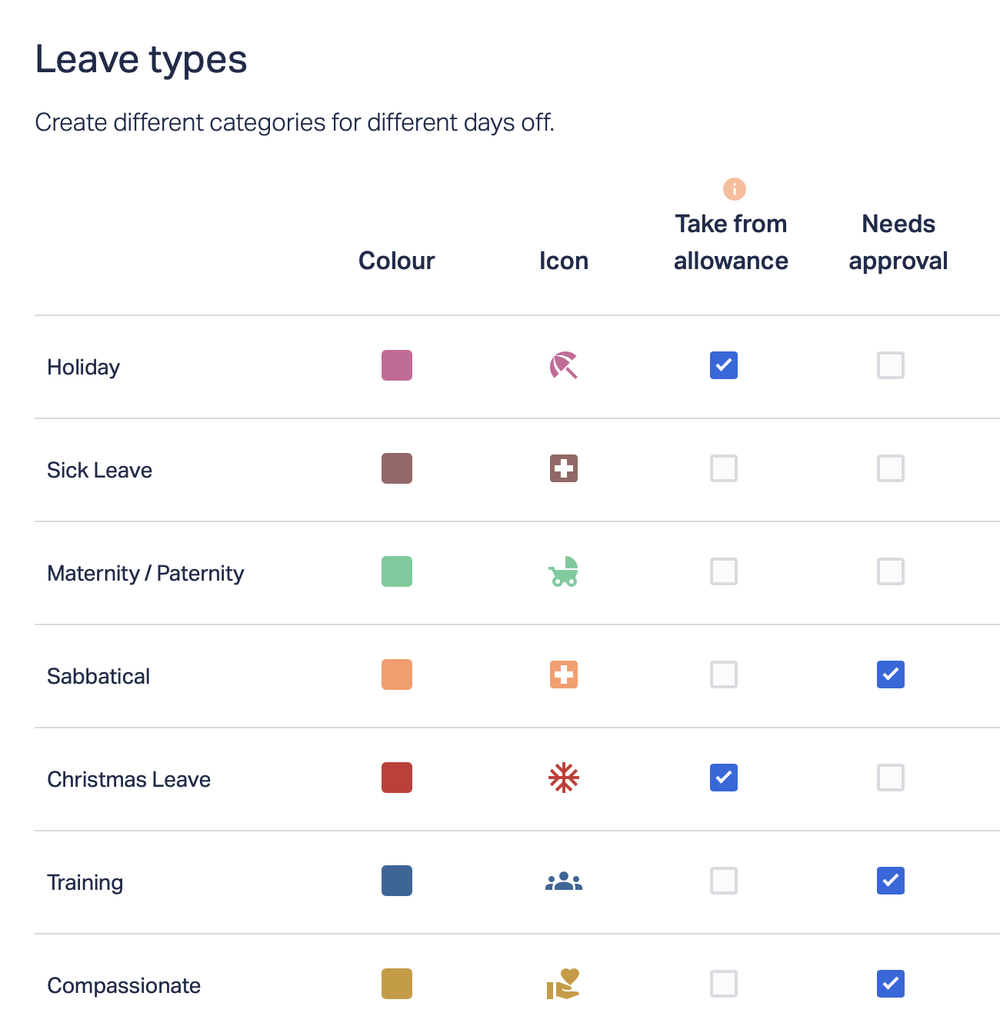
Note: You can also set all types of leave to “Needs Approval” and this means you get notified of every leave request. It’s totally up to you and what works best for your business.
Updated record of everyone's annual leave
When an annual leave or holiday request gets booked, your employee’s leave balance is automatically updated. So you always know how much leave everyone on your team has left to use.
You can find this helpful info in several places.
First, you can see people’s individual balances on your company’s Wallchart when you log into Timetastic. (In the left-hand corner next to everyone’s name is their updated annual leave balance):
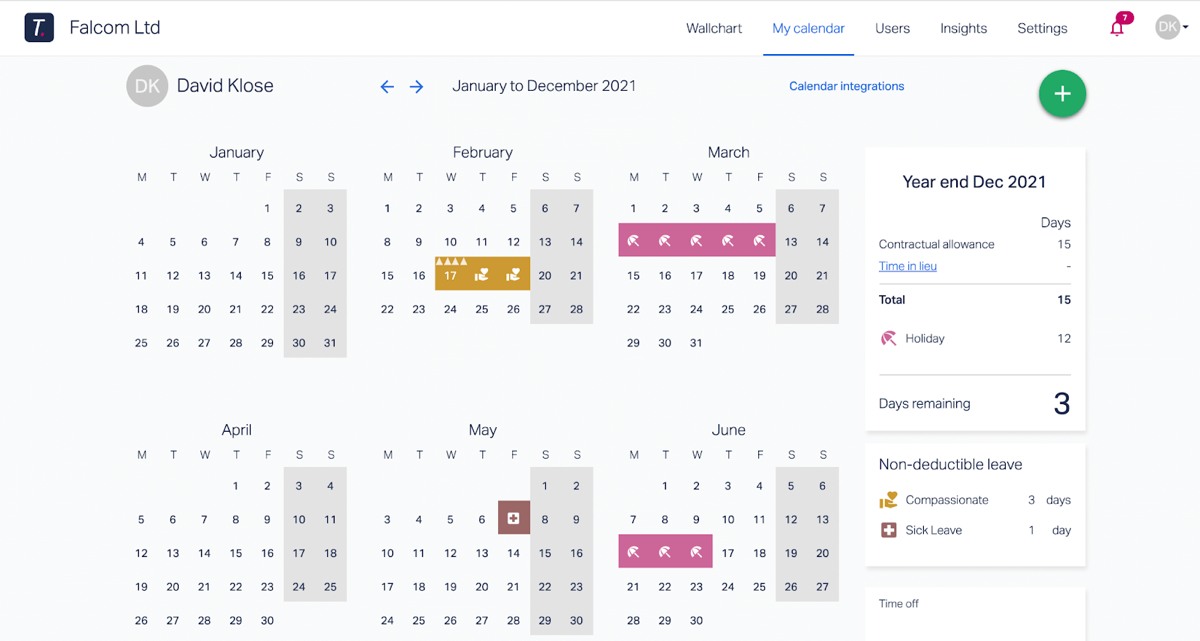
And you can also click on an individual employee to get a more detailed breakdown of how much time off they’ve taken in the year:
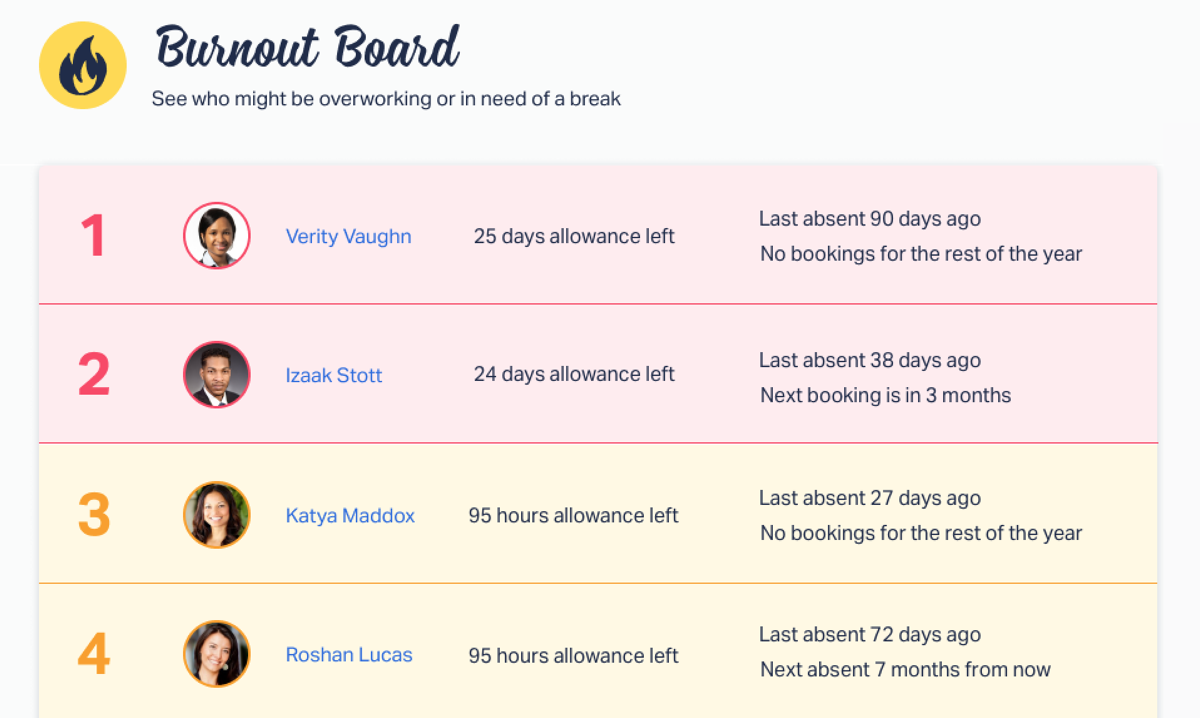
You can also click on Insights to get a view of your entire team’s leave balances and trends.
On your “Absence Insights” page, you can see which type of leave is most popular with your team, and when is the busiest time of the year for your team taking off:

And this is also where you get hold of your team’s Burnout Board, telling you who is overdue a holiday:
Absences summaries sent directly to you
In this post, we’ve explained how you can hook up your Timetastic calendar with your Outlook calendar. Using this simple integration, you don’t have to log into multiple platforms to find out who’s off, when, or why.
You can also get this information sent directly to you through absence summaries. These summaries tell you who’s off for the upcoming week. They can be sent to your:
- Email inbox
- MS Teams account
- Slack account
Add annual leave to your Outlook calendar seamlessly with Timetastic
While you can use your Outlook calendar to manage your time off and create a shared schedule for annual leave, adding holidays to your Outlook calendar is pretty clunky and burdensome. Even managing leave as a small business with a handful of employees is inconvenient and time-consuming with such manual processes.
Many businesses still adopt inefficiency processes like tracking annual leave with Excel. This is why thousands of companies choose Timetastic. It’s built so you can add holidays to your Outlook calendar with automatic integration.
Because it’s built especially for annual leave, and it plugs into your Outlook calendar without fuss. You can also use Timetastic to integrate your Google calendar too.
You can try Timetastic now for free, using our one-month free trial. You can:
- Book time off through Timetastic.
- Keep track of everyone’s leave balances.
- Automatically sync to add annual leave to an Outlook calendar easily.
- And much more.

Did you like this article? You may also like:
- A balanced review of 2 Excel templates for tracking staff leave
- More information on connecting Timetastic to your calendars (including Outlook and Google Calendar)